So this is it. I think I'm happy with it, as is it meant to be this simple... but now I do think maybe I could of done something a lot better.. But now that I have learned so much about After Effects and everything I think if we were to do another animation I would be a lot more confident than I was with this one.
Thursday, 5 May 2011
MY FINAL ANIMATION... FINI!
So this is it. I think I'm happy with it, as is it meant to be this simple... but now I do think maybe I could of done something a lot better.. But now that I have learned so much about After Effects and everything I think if we were to do another animation I would be a lot more confident than I was with this one.
Last additions...
Looking at my animation so far, there still isn't that much to it. So, I thought I would go ahead with the idea of making it look a bit three dimensional, giving it a bit of depth.


With help from Johnny, New Layer> Camera... and clicking the button that turns it 3D ad playing about with it, we managed to get it moving how I wanted it to, and by changing all the key frames to 'easy ease' it made all the movement smooth and not jerky.
We still however thought that there wasn't much happening, so ....


This is how I did it...


We still however thought that there wasn't much happening, so ....

So I came up with this idea after Johnny showed me a few more technique in After Effects. I wanted to try and get the rings moving forward and getting bigger and then going out of the frame. I need to try and get it go more in time to the music, maybe the drum beat or something that's a bit quicker.


I think this really adds a lot more to the feel of my animation. By changing the opacity of the rings, and keeping them similar colour ( a lighter shade of orange) I don't think it takes too much away from the drawn line, as you can still see it through the lines.
I think this concludes it... I'm not adding any more to it as I didn't want it to be busy and hectic, the aim was to keep it quite simple.
Time to render.
Camera Movement ...
At the moment, I think my animation is a tad boring, maybe a bit too simple.
After talking with Matt, he showed me how make it look as if the 'camera' is following the lines at it appears, with some zooming in and out as well...
This is the one that me and Matt did together as he was showing me how and what I could do.
Then I had a go on my own starting fresh. This is just the first section with the line drawing the pictures. Now I'm going to reopen this in After Effects and add the rest onto the end.. so the 'la la la' and 'by Ellie Langley' ect. I'm going to try and get the La la to come off from the line that the above ends on..
Well, this is 30 seconds! SPOT ON. I think this looks really good actually.. BUT is it good enough? I think maybe there is a little more I could do to it.. It still seems a bit too simple.. Although that is intentional, I don't want it to be TOO simple.
Once more.. wait until tomorrow and check with Matt or Johnny.. Maybe I should make it a bit three dimensional so that it looks as if it's moving closer or even further away? Worth a try anyway!
More In After...

After the first couple of experiments, I thought I'd build it up a bit more, maybe more on the page, getting the time longer and more happening on screen. Maybe have the image appearing and filling the page, like so:
I tried to get the timing to look like it flows with the music, but I'm not sure if this one is that good really. I do like the idea of having it all build up in one frame until it ends as a full image kind of...
I think the writing works especially well with this technique, as it is like my handwriting of writing out my name, it works well with the continuous line too. Happy with the text.

Going back to my original storyboard, my initial idea was the the camera would follow the line from one image to another, rather than have it all on the same bit, so try this out first I drew out each bit separately in different compositions, so then I could put them all together in order.
First section - BONGOS.
Second section - THE FACE.
Third section - HAND AND JEMBE.
Forth section - LALALALALA
Fifth section - BY ELLIE LANGLEY
Sixth section - FLAT LINE.
Then I put them all together in the right order.. making this:
I like this more than before, as by making it move on from one image to the next makes it look a lot more interesting, I feel like it's starting to really come together, even though it still needs some work.
Wednesday, 4 May 2011
Time Time Time
Now I need to think logically and work out how long each section will be to get the hole animation as close to 30 seconds as I can, without making it look silly. The timing also needs to go with the music, my main link up in timing with the music is when the voice starts to go 'La la la la la la'. This is going to link with when the letter start to appear spelling out 'La la la..'


I worked out, with six 'scenes', and 30 seconds, 30 divided by 6 is 5, so each one around 5 seconds ish.. some less some slightly more.
When I showed a course mate my animation so far, she said it reminded her of a Bruno Mars music video...
I LOVE THIS ... not the song! But the way they made the tape form the letters and then the drum! I really like the way it has been animated.
In After Effects ...
As I thought the one that I did by hand drawing and using the stop motion technique looked a bit messy and unprofessional, I got Matt (tutor) to show me how I can draw in After Effects and give the illusion the lines is being drawn extremely easily.
First open a new Composition, and name it.
Then import an image, in my case, I imported this image to use as a template:

By double clicking the image, it opens in a new layer... Then using the BRUSH TOOL and 'paint' I just drew directly onto the top of the image, trying to follow the lines.

... Then back on the Composition, into Effects>Paint I changed the 'Paint on Transparent' to ON, so the image disappears and leaves the line that I just drew.

This is what it looked like without the image behind it. I wanted to try and keep the quality of the line, as that's what's nice about my line drawings, so I used a graphics tablet with pen to draw my lines, as this meant I could keep the same movement as drawing with a normal pen, rather than struggle with a mouse that doesn't have much room to move. This was the first time I have ever used one, slightly hard at first, but practice makes perfect!
Then, if you Ram Preview it, it shows you the line appearing. Like so:
As this was my first attempt, and I just wanted to see what it looked like and if it worked well, I didn't think too much about colours. Green was my standard background colour in After Effects and the red was so it would stand out. I do really like the effect though, I think it looks much better and smoother than my stop motion attempt. Now I just need to play about with it a bit more and see what else I can do!
I decided to just keep drawing out over the same image quite a few times so that I got more comfortable using the pen and tablet, and I gradually got neater! I also changed the colours, to a deep orange and a deep red. These are both colours from my mood boards, and I think they are slightly tribal-like colours.
This one is 15 seconds long, as I increased the drawing speed after I had drawn it. This is half of the time that my final animation needs to be. This has helped give me a much clearer idea of what I'm doing. Also I think the line in this is much better, I need to keep my hand steady and swift while drawing to keep the line.
I thought I should see how it looks with the colours reversed as well, so I drew orange onto deep red. However, I really like the dark red against the orange back ground. The deep red is a bit too dark for the background really. I'm really happy with the colours I have chosen, though I will stick to orange background.
The Illusion of Appearing.
In a previous workshop, we were shown a way to make it look like the line was appearing or being drawn. I thought I would have a go with one of my drawing to see if I could do it that way.

Firstly I opened up the image I wanted to try and 'draw'.

Then opened a new layer on top, giving it a colour so that I could see it easily.

Then I changed the opacity of the new layer, so that I could see the lines of the image underneath.

Then using the Pen tool, I followed the line underneath, drawing onto the new layer/

Then Effect > Generate > Stroke to open up a new menu so I can edit the size of the stroke, and where is starts and ends...

I was following the instructions that I had blogged previously, as I knew I would want to try this out.


HOWEVER it turns out that I must of missed something MAJOR, as after I had done everything I thought I needed to, for some reason... it wouldn't work.
I'm not sure what I did wrong.. or what I missed out.. But I could not work it out so at this point, I gave up.
Monday, 2 May 2011
To My Music...
I realised that so far I have not done any experiments along to my music, so this one here is just that. I have used drawings that relate to my song and that I want in my final..
This animation is 245 photographs, at frame rate 8 and is less than 10 seconds really. I think I've managed to get the timing quite nicely with the music, although I know its certainly not perfect.
I did however manage to get the 'la la la' bit in good time HOWEVER blogger would not let me upload a quicktime video onto here, so I had to save one as a mpeg4 as well, and for some reason when I watch it back the sound is out. Not sure why this happened. It feels like blogger sped up my video as well.. :/
I think this is my best one so far, I would also like to try and do one that shows my hand drawing it as well.
Bongos... attempt 1
I thought I would do a little experiment of my actual animation, as I think I will start off with the bongos, I tried it out. To make sure I managed to get them in proportion, as it's hard when drawing bit by bit with no outline or anything, I used tracing paper for this one. I drew them out on a white sheet of paper first, and masking taped it at one end, and then did the same with the tracing paper on top, but at the other end.
This way I can have the paper underneath the tracing as I draw each bit, and then just flip it out from underneath to take the photo. It was slightly tedious but I think it worked quite well.
I really love this, but they do seem to keep coming out a bit blurred at the end, and they just look quite bad. I think that if I managed to do it all using After Effects then it would look a lot more neat, bold and professional.
For this one, I took 125 photographs all together, and used the frame rate of 14.
I need to get help with using After Effects to create the illusion of the lines being drawn, as when I tried with referring to the work shop and my notes, I think I missed something out as it does not work. GET HELP.
TOAST
This is just another little experiment I did. Expanding my new found love for STOP MOTION. It was breakfast time and I was getting in the frame of mind to get on with my work!!
I love how stop motion can make the most simple things EXCITING!! Although for some reason, my animations look fine on After Effects when I'm making them, but then when I open them in realplayer or windows media player, they seem a bit small and slightly distorted. Maybe I have it set on AE as a small composition .. check it out.
In a previous project I had bin working with purple ink in a jar of water, taking photos of it as it flows down through the water... I took lots simultaneously as the ink was moving, thinking it would make a cool animation if I ever got round to putting it together! I just came across these photos again and thought., perfect timing.
This is the shorter of the two, it would of bin better if I'd of got lots more photos and had it going on for longer, like the next one.
This is more good practice for me for using After Effects, I feel like I'm getting a lot more confident with using it, although there is still a lot for me to learn! I feel like I can use this program for most simple things by myself.
Wednesday, 27 April 2011
shadows...
On a trip to Rufford Park with my Mum and my Sister, I got a bit carried away with taking photos of our shadows! So I got us all to put our hands up and I took the photos as they moved they're arms.
Also it's not that long as it's very repetitive, as I have pretty much used the same sequence of photos over again to make it longer than it was, as slowing it down wouldn't have worked.
... in a bit of a rush.
This is just a little animation I have done on my bedroom wall. But to be honest it was quite rushed but I felt like I had to do some more experiments. Although this is a bit messy and not particularly planned out, it is another attempt at my chosen method.
Yes I know it sucks. And for some reason now replaying it is also like the other one I did on brown paper, I did not use flash for this one though. Hmmm... Maybe I would be much better using After Effects to do my animation. I need to try it out.
I think just start to get on with making my actual final animation... So I need to find out if using After Effects is a lot better, as not all of my experiments were crap... Maybe one more try out.
This is another quick crappy animation that I did, trying out using text. I think it sucks but its part of my experimentation and progress anyway...
I think it's a bit slow looking at it now, and also my writing is horrible and messy.. I need to stop trying to rush through this and take my time on things.
Wednesday, 20 April 2011
... Ojos de Brujo
My Dad has this amazing dvd with an animation that is the video to a song by Ojos de Brujo.. He watched it again recently and showed me it as I'm doing an animation.
I absolutely love this! I think it's amazing that it must of taken so many drawings and everything turns into something else.. it's so clever, and goes perfectly with the song. I also like how at some points later on in the song the animation is slightly like how I want to do mine, with lines connecting and leading onto other things ect..
Friday, 15 April 2011
Another experiment...
This is just another kinda crappy experiment of the method I am currently planning to use for my final animation. I thought I would try out what it would look like on brown paper in white pen, as white stands out against slightly darker colours.
I thought I would incorporate drums into this so its actually relevant to my storyboard.
For some reason here on blogger the video looks like TERRIBLE quality and its all blurry..
The light is a bit funny, as it was dark when I was making it, I had the artificial light in my room and also the flash on the camera as it took the photos. This has created an odd colouring that changes nearer to the bottom on the frame. This may have something to do with the bad quality appearance of it.
NOTE TO SELF: do not use flash when taking the photos. must photograph during the day with the natural light.
Lewis And I ..
AT LAST me and lewis have finished up our WONDERFUL cel animation from the work shop a couple of weeks ago...
Here are just a few of our drawings for the animation.


Our story is that Tri-man (the triangle), is hunting down Octoman (the octopus), because he has invaded his turf and his been selling drugs to his customers. Tri-man is not very happy about this, so when he finds him.. he shoots him in the head. Turf war over.
Here is our final animation. Using all the things I have been learning in the After Effects workshops and will a little help from Sara, I managed to get the timing for each frame just how I wanted it, and also add the music, which is the beginning of the Scarface theme song. I'm really happy with this outcome! ALTHOUGH I think that Cel animation requires a bit too much work and dedication, as if it took us this long to do this 12 second animation, how long would it take to make a HOLE FILM? I have a new found respect for the Disney designers.
Thursday, 14 April 2011
After Effects Workshop 3 - I AM THE PUPPET MASTER.
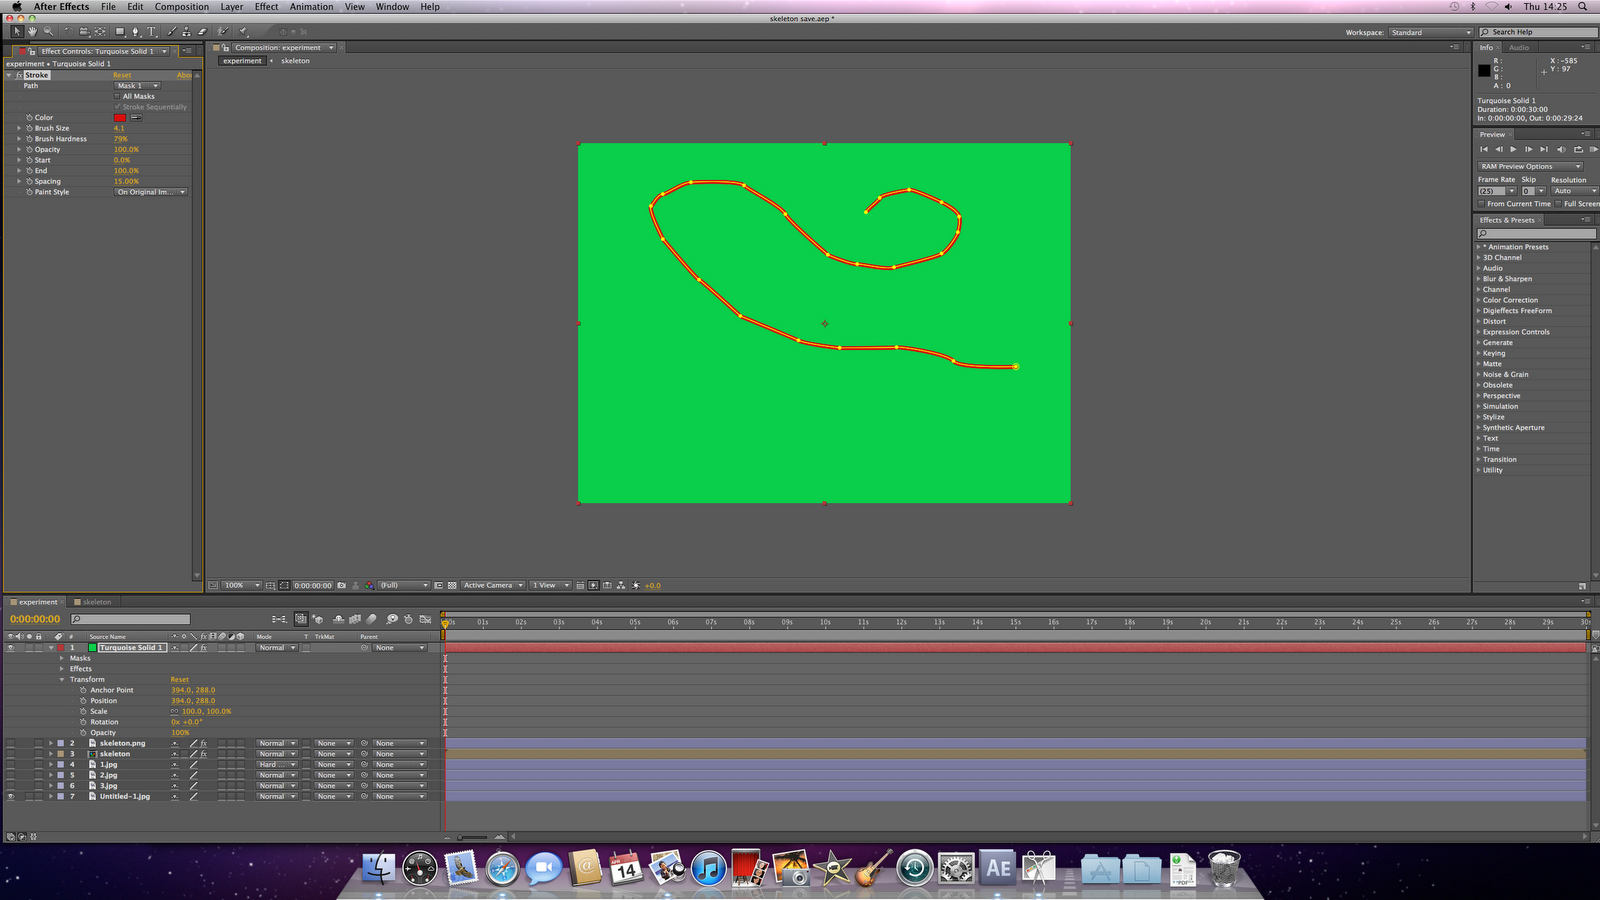
Firstly we opened up some files to work with. It was an image of a skeleton! This workshop is about parenting, linking different parts of the body of the skeleton to other parts so that they move together like a puppet.

This is the skeleton that we are working with. We made him move his head, and wave using his arms and his hands! For this first one, the skeleton was a Photoshop file, with the layers still available, so each limb was a separate layer..
..So to start with, we had to pair up all the 'parents' to their 'children', for example the torso is the parent to the upper arms, the head, and the upper legs.. then the upper leg is parent to the lower leg and the lower leg is parent to the foot.. This basically just means that they are attached, so when I move the leg from the top, the whole leg will move, not just the upper part.

This shows us what body part is the parent for which other body parts.


Select 'torso', move the yellow time line to 2s or so, then drop a key frame on the rotation line, and move which ever part of the skeleton, in this I moved the head a few times, and the arm and the hand.


So first we opened up this file, then Layer > New > Solid, to open up another layer on top of this.

We made it a colour so we could see it, and then changed the opacity so that we could see the line in the layer underneath.

Then just using the Pen tool, we drew a line over the top of the line, following it exactly...

Then in the top menu we went Effect > Generate > Stroke. This opens another different menu of options at the side, which allow us to change the colour of the line, and the brush size and hardness, and also the opacity, and where is starts and ends.

So I changed the colour of my stroke to RED so it stood out more...

... and then changed the start time, so that when it starts the line is visible fully, but as it runs through, the line starts to disappear :


I think this is really good to know, for time when you just want something to move across the page for example, or to follow the path around another shape or image in your animation. I may not need this for my own animation this time, but it's certainly helpful to know this for the future.
Ok, and now this is the last thing we did in this workshop... as we did cram a lot into one session! Masking...

So we opened up this photograph along with 2 other ones which are on layers underneath this image at the moment.

Using the Pen tool, we just drew a random shape, and cut away the rest, only leaving this section of the image...

Then in the options that open up from the toggle in the bottom window menu, you see an option called 'Mask', which opens up more options of things you can change.. You can do things like feather out the edges and change the opacity of the image..

.. Which is what I did.. I made it more transparent so that we would be able to see the other image slightly through it..

You can also change the appearance of the image with these other options on this drop out menu (seen above) I changed mine to 'Hard Mix', which has changed the colours of the top layer image slightly.. making it more visible I think.
The animation made from this basically shows the smaller section of image 'feathering' out, and also the colours changing into 'hard mix'.. but there must of bin a problem when I saved it, that I didn't notice at the time, so I do not have it.

This is the skeleton that we are working with. We made him move his head, and wave using his arms and his hands! For this first one, the skeleton was a Photoshop file, with the layers still available, so each limb was a separate layer..
..So to start with, we had to pair up all the 'parents' to their 'children', for example the torso is the parent to the upper arms, the head, and the upper legs.. then the upper leg is parent to the lower leg and the lower leg is parent to the foot.. This basically just means that they are attached, so when I move the leg from the top, the whole leg will move, not just the upper part.


Select 'torso', move the yellow time line to 2s or so, then drop a key frame on the rotation line, and move which ever part of the skeleton, in this I moved the head a few times, and the arm and the hand.
This is what it looked like after! It's a bit slow but I wanted to see what it was like. We were able to make him move, like a puppet.
Then Johnny showed us another way of making him move, that is more 'bendy' and free. For this one, we opened the skeleton as a PNG file, so it had been flatten meaning all the body parts are attached and in the same layer.
For this one, we used the 'puppet pin tool', and clicked to make a point at all the joints, but including the top of the head, and the kneck ect as well as like arms and legs.


This way allows the actual bones to seem like they are bending and curving as well as moving at the joint. You can change it as much as you want and get all sorts of different outcomes and techniques.
This was just a quick little test of what it could do, you can tell that it moves a lot differently to the first one. Depending on what effect you want, either one works great.
THEN he showed us how to make a line look like its appearing as it's being drawn.. WHICH IS WHAT MY ANIMATION WILL BE LIKE! So this was VERY helpful! Although slightly confusing too...

So first we opened up this file, then Layer > New > Solid, to open up another layer on top of this.

We made it a colour so we could see it, and then changed the opacity so that we could see the line in the layer underneath.

Then just using the Pen tool, we drew a line over the top of the line, following it exactly...

Then in the top menu we went Effect > Generate > Stroke. This opens another different menu of options at the side, which allow us to change the colour of the line, and the brush size and hardness, and also the opacity, and where is starts and ends.
So I changed the colour of my stroke to RED so it stood out more...

... and then changed the start time, so that when it starts the line is visible fully, but as it runs through, the line starts to disappear :

Then I changed the colour of the line to white, so it's the same as the background of the streak that we started off with on the first layer, so that when the streak that I drew starts to go, the line underneath starts to appear... giving it the illusion that it's being drawn out in front of us.
And then this is how it looked! Although extremely simple and not quite perfect, I now feel that I could make an attempt with some of my drawings maybe? As this might be how I end up putting my hole animation together...
This one was also another really simple thing. Johnny showed us that if we just drew a shape, in this case a star, we could make it move around the page in real time however we wanted it to.

First you have to draw the shape, then at the top right, where is says 'workspace', change it to 'Animation', and then again, more options appear at the side. One is called 'Motion Sketch', and with this you can change the timing, so it will either be the time you move it as, or you can slow it down or speed it up..
Basically you click on 'Start Capture' and then click on your shape, holding click down you can then move the shape around the page with your mouse, making it follow what ever path you wish... Then when you're done, the shape will follow the path that you created for it... Like so:
I think this is really good to know, for time when you just want something to move across the page for example, or to follow the path around another shape or image in your animation. I may not need this for my own animation this time, but it's certainly helpful to know this for the future.
Ok, and now this is the last thing we did in this workshop... as we did cram a lot into one session! Masking...

So we opened up this photograph along with 2 other ones which are on layers underneath this image at the moment.

Using the Pen tool, we just drew a random shape, and cut away the rest, only leaving this section of the image...

Then in the options that open up from the toggle in the bottom window menu, you see an option called 'Mask', which opens up more options of things you can change.. You can do things like feather out the edges and change the opacity of the image..

.. Which is what I did.. I made it more transparent so that we would be able to see the other image slightly through it..

You can also change the appearance of the image with these other options on this drop out menu (seen above) I changed mine to 'Hard Mix', which has changed the colours of the top layer image slightly.. making it more visible I think.
The animation made from this basically shows the smaller section of image 'feathering' out, and also the colours changing into 'hard mix'.. but there must of bin a problem when I saved it, that I didn't notice at the time, so I do not have it.
Wednesday, 13 April 2011
Method Experiment..
Before going ahead with making my animation, I thought I should try out my method.. to see exactly how it will work and to see if it looks good! For this little one, I just drew on top of a photograph that I had taken and printed out. I drew each line bit by bit, and for this 5 second animation I took a total of 73 photographs.
I am definitely happy with this method and think I will go ahead and do a rough try out from my actual storyboard! Or I might even do another experiment as this is ADDICTIVE! The only annoying thing is that it looks like the camera moves slightly.. but this is just because the camera is focussing so it makes it a tad jumpy.. as I am using a tripod to hold my camera still!
I am definitely happy with this method and think I will go ahead and do a rough try out from my actual storyboard! Or I might even do another experiment as this is ADDICTIVE! The only annoying thing is that it looks like the camera moves slightly.. but this is just because the camera is focussing so it makes it a tad jumpy.. as I am using a tripod to hold my camera still!
Monday, 11 April 2011
Light Photos!
After trailing around town looking in lots of shops trying to find sparklers.. I finally found an odd little shop, that had letter sparklers.. like so:

I wasn't sure at first, but I thought as I couldn't find anything else I should at least try it! So I did, and this is how they turned out!


This one is an attempt at drawing out Bongos.. Can you tell?


This last one is also meant to be a drum.. ! I think I needed to be in a more open space, but at the time it was very windy! So I needed shelter, and also the sparklers weren't that great. One of them went out within seconds and was really hard to try and light again. I struggled to light them in the first place, so relighting them seemed like a lost cause.
I think if I was in a more open space and if I drew them a lot bigger it would be a lot better and also clearer. I might try this again, and hope its less windy. Also as they are letters and they're quite small, they do finish quickly, so I would need a lot more.
Also.. I had a thought while struggling to light the sparklers.. A TORCH. Surely a torch would work in the same way, and maybe even the line would be clearer and I could do it neater? Question is.. do I have a torch? ... Definitely something worth trying!
Subscribe to:
Posts (Atom)